Have you played along with our Circle challenge yet? There's still time! For my card, I created a shaker card using a Shake-It pouch and stamps from Impression Obsession. I used Earth Ultrafine Flower Soft and some coffee grounds for my filler. I used a brown Blo-Pen for a quick spritz of speckles across the card.
You can click over to my blog to see how I created the word border around my circle opening! Remember, if you'd like to join in on the Sprinkle challenge, pull out the Flower Soft - you might even win a prize! Post your Circle project in the Splitcoast Gallery using the keywords flowersoft (one word) and FSC36. We'd love to have you join us!
Tuesday, September 27, 2011
Monday, September 26, 2011
Fuzzy Spider!
Just poppin' in (or should I say danglin' around.........hehe) to share this quick and easy Halloween Project with you! I LOVE to use my Ultrafine Black Flower Soft to make Fuzzy Creatures like this spider!!!
Happy Stamping!
Vicki
Wednesday, September 21, 2011
FCS36 Circles!
Flower Soft Challenge (FSC36) is...
Circles!
The prize this week – Winners choice – 4 colors of Flower Soft!
Entries must be uploaded to the SCS gallery and use at least one Flower Soft product (Flower Soft, toppers, stamps) to be eligible to win. Please use the keyword FSC36 and flowersoft (one word) when uploading to the Splitcoast Gallery so we can find your project.
Entries will be accepted for the challenge until Midnight CT on Sept 29th. The winner’s card will be featured on the Flower Soft blog on Sept 30th!
Tuesday, September 20, 2011
Country Flower Shop
I made a yellow card to cheer myself up on a particularly gloomy day - this little flower shop from the Country Village Topper collection is so inviting. I used Meadow, Lemon, Citrus Crush, and Earth Flower Soft to add dimension to the scene, and a Sakura glaze pen on the window and door.
Thanks for looking! Be sure to check in tomorrow for a new Sprinkle Challenge!
Monday, September 19, 2011
Spooky Treats!
Gold Flower Soft makes a Super Duper Hat Band! Click HERE to see more details on my project!
Have a great week and be sure to check out our new challenge on Wednesday!
Tuesday, September 13, 2011
Snow Globe toppers
Here's a fun little die-cut card featuring the Christmas Snow Globe toppers - these toppers are made to be used with the dimensional Display Globes, but they can be used alone or in a frame like I've created here with Spellbinders dies.A couple of angled shots to show the dimension you can create with these decoupage kits - I used glitter and Polar White Flower Soft to add snow to the scene.
Monday, September 12, 2011
Vintage Christmas
Making Christmas cards is a snap with this lovely new Spellbinders Vintage Christmas card kit.
You simply use your coordinating Nestabilitie to cut out the fabulous preprinted images and away you go~!
A little touch of Flower Soft - in this case, Ultrafine Strawberry adds a touch of dimension.
For more details about the card, please visit my Blog
Have a Wonderful Week!
Vicki
Wednesday, September 7, 2011
Flower Soft September Blog Hop!
Please join the Flower Soft team on an inspirational hop.
This month’s theme is Anything But a Card
The blog hop starts on the Flower Soft® Blog on Sept 7th at 8:00am CT and ends Sept 15th at midnight CT. The winner will be announced on the Flower Soft® Blog on Sept 16thth. If you get lost along the way the complete hop list will be posted on the Flower Soft® Blog.
Be sure to comment on every blog in the hop. One lucky person that comments on one of the blogs will be chosen to receive a 4 pots of Flower Soft!!!
Here is a project (that’s my nephew Mason when he was a little guy!) to get us started. I stamped the tree image and colored it with Touch Twin markers and cut it out. I wanted a subtle dried leave texture so I added a mix of Ultra Fine Citrus Crush , Ultra Fine Sage, and Ultra Fine Strawberry Flower Soft to the tree and ground.
Supplies:
Stamps: Outlines Rubber Stamps (I-38 Old Tree)
Cardstock – www.DiscountCardstock.com (Neenah Solar White 80#, Papaya Puree Medium 70#, Posh Milk Chocolate Felt 80#)
Inks: Clearsnap Premium Die Ink (Sky, Grape, Chocolate, Artichoke)
Die cuts: Sizzix eclipse (657149 Basic Shapes, Starter & Rockin’ Jane)
Markers: ShinHan Touch Twin ( BR92, BR94, BR103, 120)
The hop list:
Linda Beeson
Vicki Garrett
Debbie Seyer
Gini Cagle
Dina Kowal
Deb Felts
Cibele Glazer
Jeanne Streiff
Vicki Garrett
Debbie Seyer
Gini Cagle
Dina Kowal
Deb Felts
Cibele Glazer
Jeanne Streiff
Have a great day!
Jeanne
Tuesday, September 6, 2011
Christmas Tree Pyramid tutorial
OK! Here's the tutorial I promised last week on assembling the Christmas Tree Pyramid cards. You'll need to start by cutting out the pyramid panel, and scoring from the point to the opposite angles, as shown:
Next, you'll cut out the decoupage pieces - each piece is numbered so you can keep them in order as you cut them out. I find it easiest to cut with a craft knife.
Here are all the cut out pieces, ready to shape and assemble on the card.
Take each piece, turn it over, and add some dimension by laying it on a foam pad and pressing into it - I used the wooden end of my embossing stylus, but you could use a rounded pen cap, or anything else with a similar shape.
Turn the pieces face up and press into the top of each piece - this will make the bottom rise a little, and also flatten out the top so it's easier to glue to the card.
The tree on the pyramid has some red lines across it - these are the guidelines for attaching the cut out pieces. Beginning at the bottom, line up the pieces one at a time to create the tree.
Here's the card with all the pieces attached.
Working one section at a time, add Polar White Flower Soft to the tree... I used a little glitter as well. Here's my snowy tree....
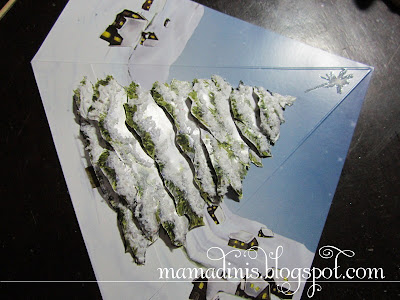
...and my completed card!Thanks for stopping by!
Dina
Thursday, September 1, 2011
Winner of the Flower Soft/Our Daily Bread Designs Hop!!!
The Flower Soft winner is....
- RubbrKitty said...
- I didn't realize how versatile Flower Soft really is. Now, I know! Thanks for the examples.
- August 26, 2011 9:38 PM
- Please contact me with your mailing info and phone number!
- The winner of the Our Daily Bread Designs prize can be found here:
- Our Daily Bread Designs Winner
Thanks for making our Hop a success!!!
Subscribe to:
Posts (Atom)